
Knitting Noomi

I have just finished my third Noomi Cardigan and took the opportunity, as I was knitting it, to make notes and take photos so you can see exactly how I make it (ie-how the pattern is written). You can read through it as you are following your pattern, and I hope it will help you if you are stuck or unclear at any point.
I’ve grown up knitting flat and only realised as I started to write patterns for other hand-knitters, that most people like to knit in the round. I apologise to in-the-round knitters that I have written the pattern in this way but I have such an aversion to the idea of cutting my knitting that I couldnt bare to write my pattern with a steek, however many of you have done this with beautiful results-and so it is very possible to do so!
I wanted to make this version of Noomi for my daughter in a golden-y colour palette using the beautiful yarns from Bouclelaine, a local (to NE France) family-run company that sells pure wool yarns all in natural colours. I used “Sable naturel” as the main colour (MC) and “Curcuma” as the contrast colour (CC), both from the Roussin-Alpaga20 Gamme. A skein of 100g each was more than enough. The quality of the yarn is incredibly light and soft but full of texture and character. It’s a dry yarn that puffs out when washed-exactly the sort of yarn I love, as it makes the colours blend together so beautifully. I used “Pollen en pelote” from the Mérinos-Angora range for the ribbing at the body bottom, just for a bit of textural difference and I think this slight change in colour from the CC makes the cardigan more interesting.

Bouclelaine colour cards.
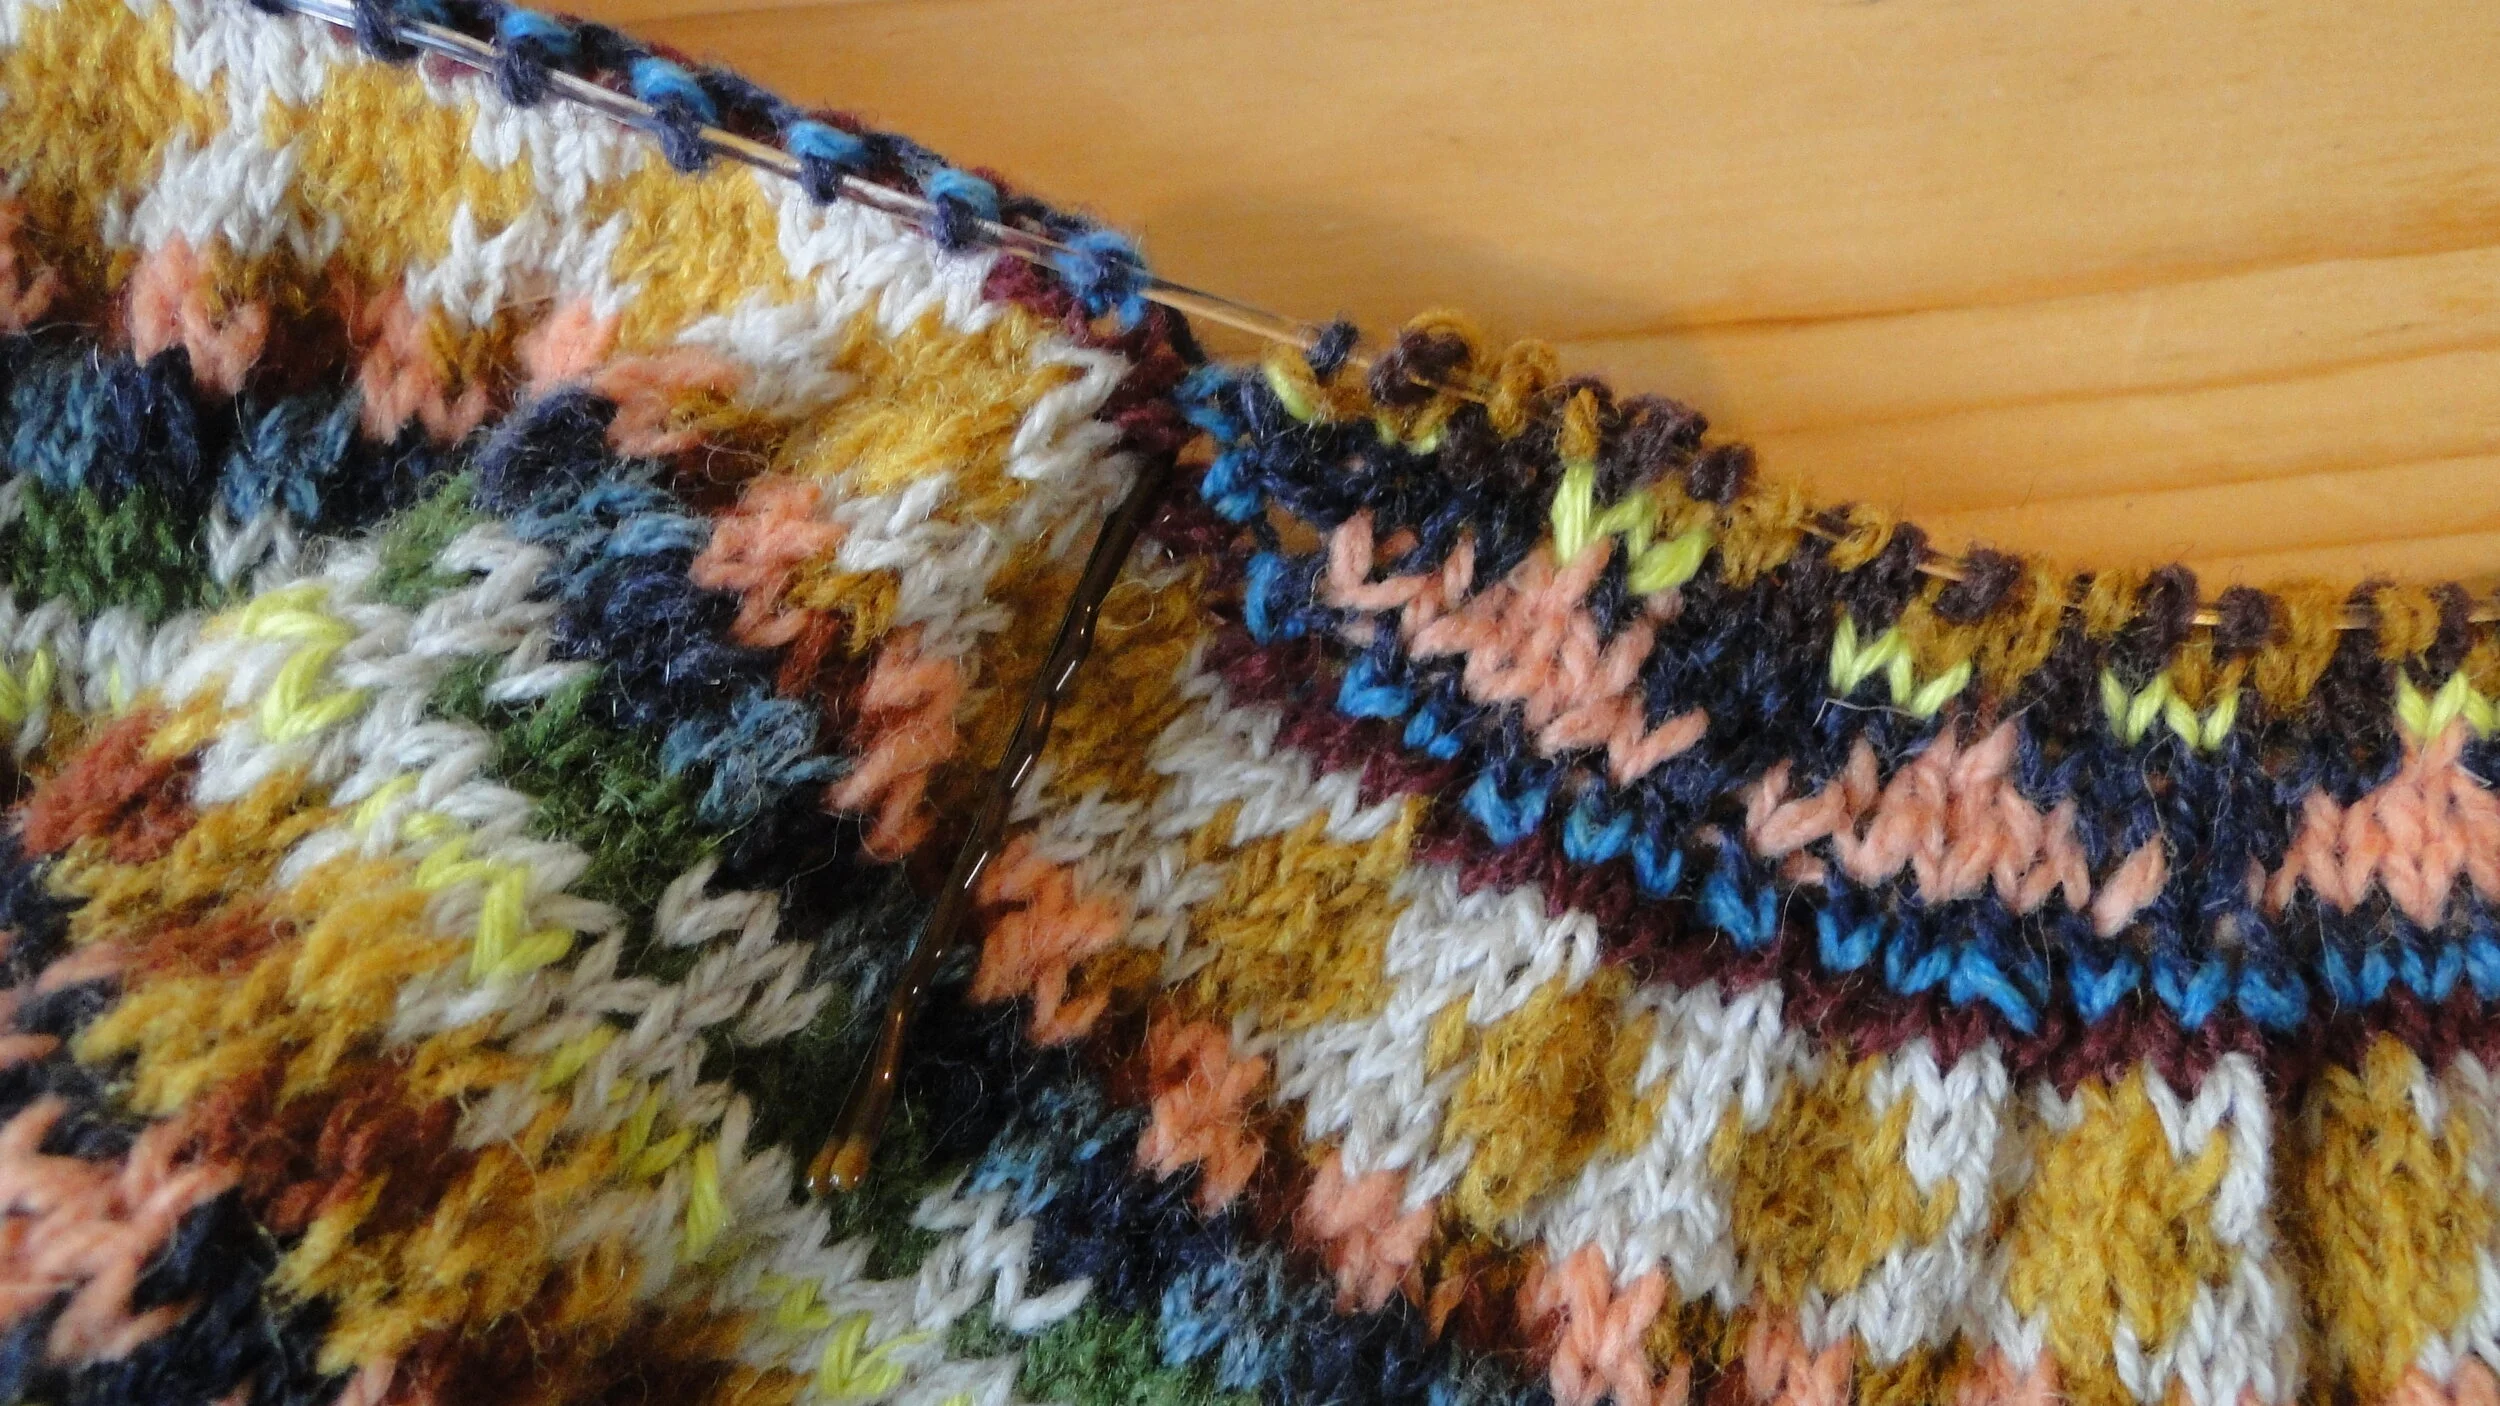
I love the colours in the Bouclelaine range, but felt I needed to add some others from my stash to add a bit of freshness and a ‘ping’ in the yoke, and I did this with the addition of Baracuda blue and Pineapple (see yoke photo below). I find that, if the colour combination in a Fair isle sweater is too tasteful, the finished garment can look ordinary or even boring. I also always like to use at least 1 highlight colour, and even a colour that can seem shocking or brash often adds just the sort of zing I feel a colour-combination needs. Many of the colours in this yoke come from different ranges and so have differing textures. This is done on purpose, as I like the patchwork-y look and feel that it gives. I have added a free pdf of a sample 2y size yoke with a key to all the colours I have used in this colourway for you to download :

A close-up of the yoke colours.
I used 3 mm needles and the 2 ply yarn to knit this version (Roussin-Alpaga comes in 2 ply and 3 ply). My pattern specifies 2.75 mm needles and I have a rather loose tension so I knew the cardigan would come up a bit bigger than that specified in the dimensions on my schematic in the pattern, but this is good as Eloise is nearly 3 now and in between the 2y and 4y size. So I knit the size 2y. The final dimensions were: circumference: 63cm; upper arm circumference: 26 cm.

Steps 1 and 2 are finished, I have my body base + 2 x sleeves. I like to block the pieces as I go along, and have finished off by knitting one row of waste yarn in case anything un-ravels.
Once I’ve completed the first 2 steps and have the bases (as above), I now mark the ‘side seams’ and set aside the stitches under the arms, putting them on holders. For the time being, my stitch counts match those in the pattern. This can change as I go up the yoke, but I don’t worry too much about that as long as the general “recipe” for the decreases is used.

Marking the ‘side seams’ and putting the under-arm stitches on holders (I always use bobby pins, as I often have them in my hair I find it very practical to slip them out of my hair from where I am sitting and they work perfectly as stitch-holders!
Next, I thread the circular needle though all 3 parts:

Threading the needle back though the stitches and placing the sleeves at the mid-way point as I go.

All pieces are on the needle.
Now time to start the yoke and introduce all the beautiful colours! The first 6 rows are very tight when I get to the arms so I have to pay attention to make sure I’m properly spacing the yarn as I work the different colours at this point.

The yoke is being knitted.
Now, I’ve done the last decrease and I need to mark off where I’m going to start my short rows:

I place a marker after 17 stitches each side of the cardigan to mark off the half-way point that is the back of the cardigan.
Now I start to knit the 6 rows from the short rows yoke chart between the two markers at the back, wrapping the yarn around the next stitch before I turn.

The 6 short rows have been knitted between the markers at the back.
A close-up of the point where I have wrapped the yarn around the next stitch before I turn. To avoid a hole, you can knit each row one stitch further along before wrapping and turning.
Next, I leave all the stitches on the circular needle and pick up the side stitches using my smaller rib needle to knit the button bands BEFORE I knit the neck ribbing. I do this as I think it has a neater and more professional look than knitting the buttonbands after the neck ribbing has been finished. This means that if you are steeking, you would have to steek at this point. I pick up about 3 stitches every 4 rows. I find that if I pick up each stitch, the buttonband bends and it needs to be taught and give structure to the cardigan.

Picking up 3 stitches every 4 rows for the buttonbands.
Next, I tightly knit 2 rows of garter stitch then on the 3rd row, I cast off 2 stitches for a buttonhole, with 10 stitches between buttonholes. On the 4th row going back, I cast on the stitches again, where I had cast them off on the previous row. I didnt specify this way of making buttonholes in my pattern as my tech editor suggested most people make buttonholes by using a yarnover. After 5 or 6 rows of garter stitch, I cast off loosely on the wrong side so that the edge is in purl. Now I knit the same amount of stitches on the other side of the cardigan, omitting the buttonholes.

My buttonholes, using the cast-off, cast-on technique.
Now, making sure to pick up 3 extra stitches at the buttonbands, I knit the neck ribbing, using 1 row only of these colours in this order: Ambre, Mousse, Heathered green, Baracude blue, Pinapple, Brique, Pèche givré, Blanc naturel, Sable naturel. I cast off purlwise in Sable naturel. Next, I plunge the cardigan into a basin of hot water, rubbing between my palms with soap over the entire piece. After ironing carefully with a cotton cloth between the iron and sweater, I lay it out flat on a towel somewhere warm. As soon as it’s dry, I sew up the sleeve seams, graft the underarms stitches and lastly, the best bit, get Eloise to try it on. But I have to wait for the morning for that, as it was about midnight by this stage.

